
A custom AI agent is an agent with your instructions, your choice of model, and the tool families you leave switched on, plus a few basics that are always on. In NetPilot you build one in Agent Studio, a page inside the app where you fill in one form and get an agent you can run yourself or publish to your team. This guide walks through that form field by field, for a network engineering workflow you want an agent to own: pre-change validation, a configuration audit, a migration rehearsal, or anything else you can describe.
Every label below is quoted from the product, so you can follow along with the app open.
The short version: open Agent Studio, click Create a private agent, write the Instructions, pick a Model and an Effort level, untick the Tools the agent should not use, and click Create. The agent is then one click away on every new chat.
Build the agent in 8 steps
Step 1: Open Agent Studio and start a new agent
Click Agent Studio in the sidebar, right under New Chat. The page lists your agents under Private Agents. If you belong to a team, a second section, Team Agents, sits below it.
Click the Create a private agent tile. The editor opens with the title New agent and the status Draft. The form is on the left. On a wide screen a live Preview on the right shows the new-chat screen your agent will have, and it updates as you type.
Step 2: Name and describe the agent
- Name is required and holds up to 40 characters. It is what you and your team pick the agent by.
- Description is optional and holds up to 200 characters. It shows on the agent's card in Agent Studio.
- Icon is optional. Click the circle at the top of the form to choose one of 12 emoji, or leave it on None and the card shows the first letter of the name.
Step 3: Write the instructions
Instructions is the field that makes the agent yours. The editor says it plainly: "Your instructions are this agent's whole persona. NetPilot adds how the lab, files and tools work underneath them." So you write the job, and NetPilot supplies the knowledge of its own lab and tools.
The empty field asks three questions that make a good outline: what does this agent do, how should it behave, and what should it avoid? A counter under the field shows how much of the 4,000 characters you have used.
Two things to know before you write:
- Describe the method, not only the goal. An agent told to "validate changes" improvises. An agent told which checks to run before and after, and what the report looks like, returns the same shape of result every time.
- Leave credentials out. The save is refused when the instructions contain what looks like a password, token, key or secret.
Step 4: Add conversation starters
Conversation starters are shown as buttons on a new chat with the agent. You can add up to 4, with up to 120 characters each.
A button shows only the first few words of its starter, and a click sends the full text. Write each starter as a complete request and put the distinguishing words first.
Step 5: Pick the model and effort
Model opens on Sonnet 5. The list also offers Opus 5, Haiku 4.5 and Fable 5.1. A model your plan does not include is listed but cannot be picked.
Effort offers five levels: Low, Medium, High, Extra and Max. The editor notes that "Every chat with this agent runs at this level." Higher effort gives more thorough answers, takes longer and uses your limits faster.
Pick the model first, because changing it resets Effort to that model's default: Medium for Sonnet 5, High for Opus 5 and Fable 5.1. Haiku 4.5 takes no effort level, so the Effort field is switched off for it.
Step 6: Choose the tools
Tools is a checklist of seven bundles. Each bundle is a set of tools together with the guides and the parts of the app that go with them. All seven are ticked on a new agent, and the editor's instruction is "Untick what this agent should not do." The info mark beside each row lists the exact tool ids.
| Bundle | What it switches on |
|---|---|
| Topology Design | Designing a topology, generating device configs and reading both back. Brings the device guides for each supported network OS. |
| Packet Tracer | Exporting a lab as a .pkt file, with the Packet Tracer guides and the download card. Includes Topology Design's tools. |
| VM Sandbox | The lab VM (ContainerLab): deploying a topology on real network operating systems, pushing configs and running commands on devices. Includes Topology Design's tools. The VM and Labs tabs apply only with it on. |
| Agent Workspace | Reading, writing and searching files, saved artifacts such as reports, and memory. The Files and Artifacts tabs. |
| Web | Web search and fetching a web page. |
| Follow-ups | Scheduling a task to run later in the same chat, and listing or cancelling scheduled tasks. |
| Sub-agents | Handing work to a helper agent that runs in the background. The helper gets the same bundles as this agent. |
Three details the table does not show:
- Bundles overlap. Packet Tracer and VM Sandbox both carry Topology Design's tools, so unticking Topology Design alone does not remove the design tools while either of those stays on.
- A few basics are always on. Every agent can ask you a question, keep a to-do list and search its own tools. Those are not in the checklist.
- Custom tools are a separate checklist. A second section, Custom tools, appears under Tools when NetPilot has switched on a custom tool set for your account or your team. These are off until you tick them. One example is Peering intelligence: 13 read-only tools over PeeringDB and RIPEstat.
Step 7: Choose who can use it, then create
Under Who can use it, a new agent is set to Only me. A team admin also sees Everyone on my team, which publishes the agent to the team. This choice is set when the agent is created and cannot be changed afterwards.
Click Create in the top right. The button stays off until the agent has a name and instructions. You land back in Agent Studio with the new agent's card in the grid. To change the agent later, hover the card and click the edit icon. To remove it, click the delete icon on the card or Delete this agent at the bottom of the editor.
Step 8: Start a chat with the agent
There are two ways in:
- From Agent Studio. Click the agent's card. A new chat opens with that agent.
- From any new chat. Open the model menu in the composer. The Agents list at the top shows NetPilot, which is the default agent, then every agent you can use. Pick yours.
The new chat shows the agent's name as the headline and its conversation starters as buttons. The agent is fixed for a chat once you send the first message, and its model and effort are locked in with it: the model menu reads "set by the agent". To use another agent, start another chat.
From here the work is the same as in any NetPilot chat. Ask in plain English:
"Validate this OSPF summarization change before Saturday's window. Configs attached."
With VM Sandbox on, the agent builds the lab on real network operating systems, runs the right command on every device and returns one consolidated result. Direct CLI is always available too. Click a device in the lab panel to open an SSH session and run any show command yourself when you want to check a result by hand.
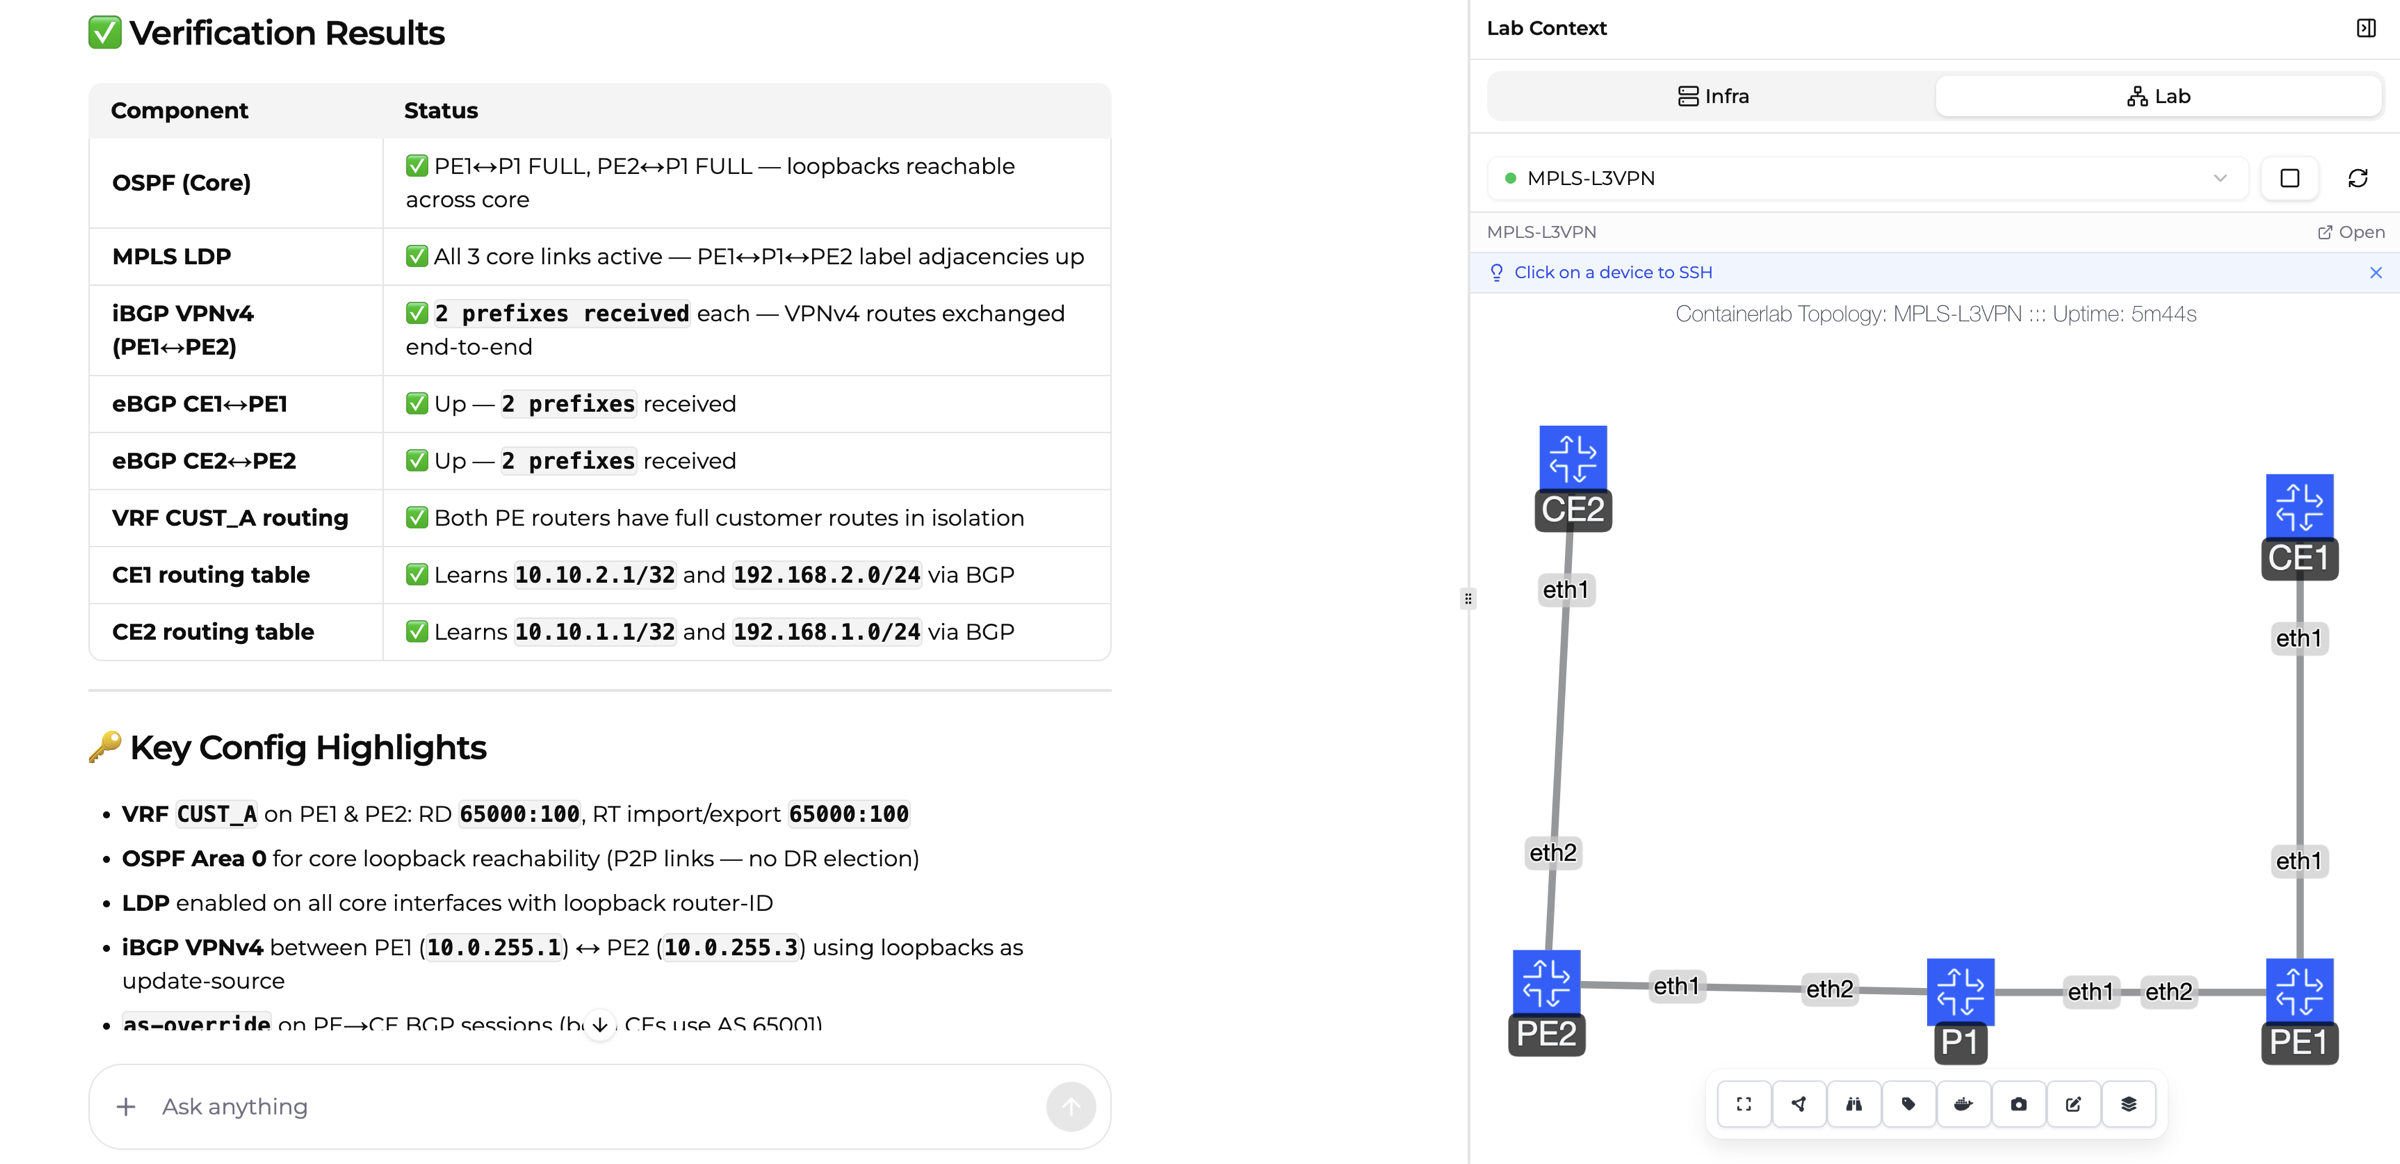
A lab result in a NetPilot chat: the agent's checks on the left, the running topology with SSH access on the right.
Example: a pre-change validation agent you can copy
Pre-change validation means proving a planned change in a lab before the maintenance window. It suits a custom agent well because the method is the same every time. Here is a complete agent. Copy the fields into the editor and adjust the wording to your own change process.
- Name: Pre-Change Validator
- Description: Proves a planned change in a lab and reports what changed, with a tested rollback.
- Model: Opus 5
- Effort: High
- Tools on: Topology Design, VM Sandbox, Agent Workspace, Sub-agents
- Tools off: Packet Tracer, Web, Follow-ups
- Who can use it: Everyone on my team, if you are a team admin
With those choices the Preview's summary line reads "Opus 5 · High effort · 4 of 7 tool families".
Conversation starters:
Validate this change before the window. I will attach the configs and the change description.
Compare routing tables before and after this change and list every route that moved.
Test the rollback for this change and confirm the baseline returns.
Draft the change procedure with verification steps and a rollback section.
Instructions:
You are a pre-change validation agent for our network team.

Your job: prove a planned change in a lab before the maintenance window,
and report what the lab showed.

For every change request:
1. Ask for the change description and the current device configs if they
   are not attached. Do not guess missing configs.
2. Build a lab that mirrors only the devices and links the change affects.
   Use the same network OS as each real device where an image is available,
   and say so when you substitute one.
3. Capture a baseline before the change: routing tables, protocol
   neighbors, and reachability between the endpoints that matter.
4. Apply the change exactly as written. Do not fix or improve it without
   asking.
5. Repeat the baseline checks and compare. Then test the rollback and
   confirm the baseline returns.

Report format:
- Verdict first: PASS, FAIL or NEEDS REVIEW, in one line.
- A table of checks with before, after and result.
- The exact commands for the change and for the rollback.
- What the lab did not cover, for example hardware, scale or traffic
  volume.

Rules:
- Show the command output that supports each result. Never report a check
  you did not run.
- Stop and ask before any step that deletes a lab or overwrites saved
  files.
- Save the final report as an artifact named after the change ticket.
That is about 1,300 of the 4,000 characters, which leaves room for your own naming rules, your approval steps and the checks your team always runs.
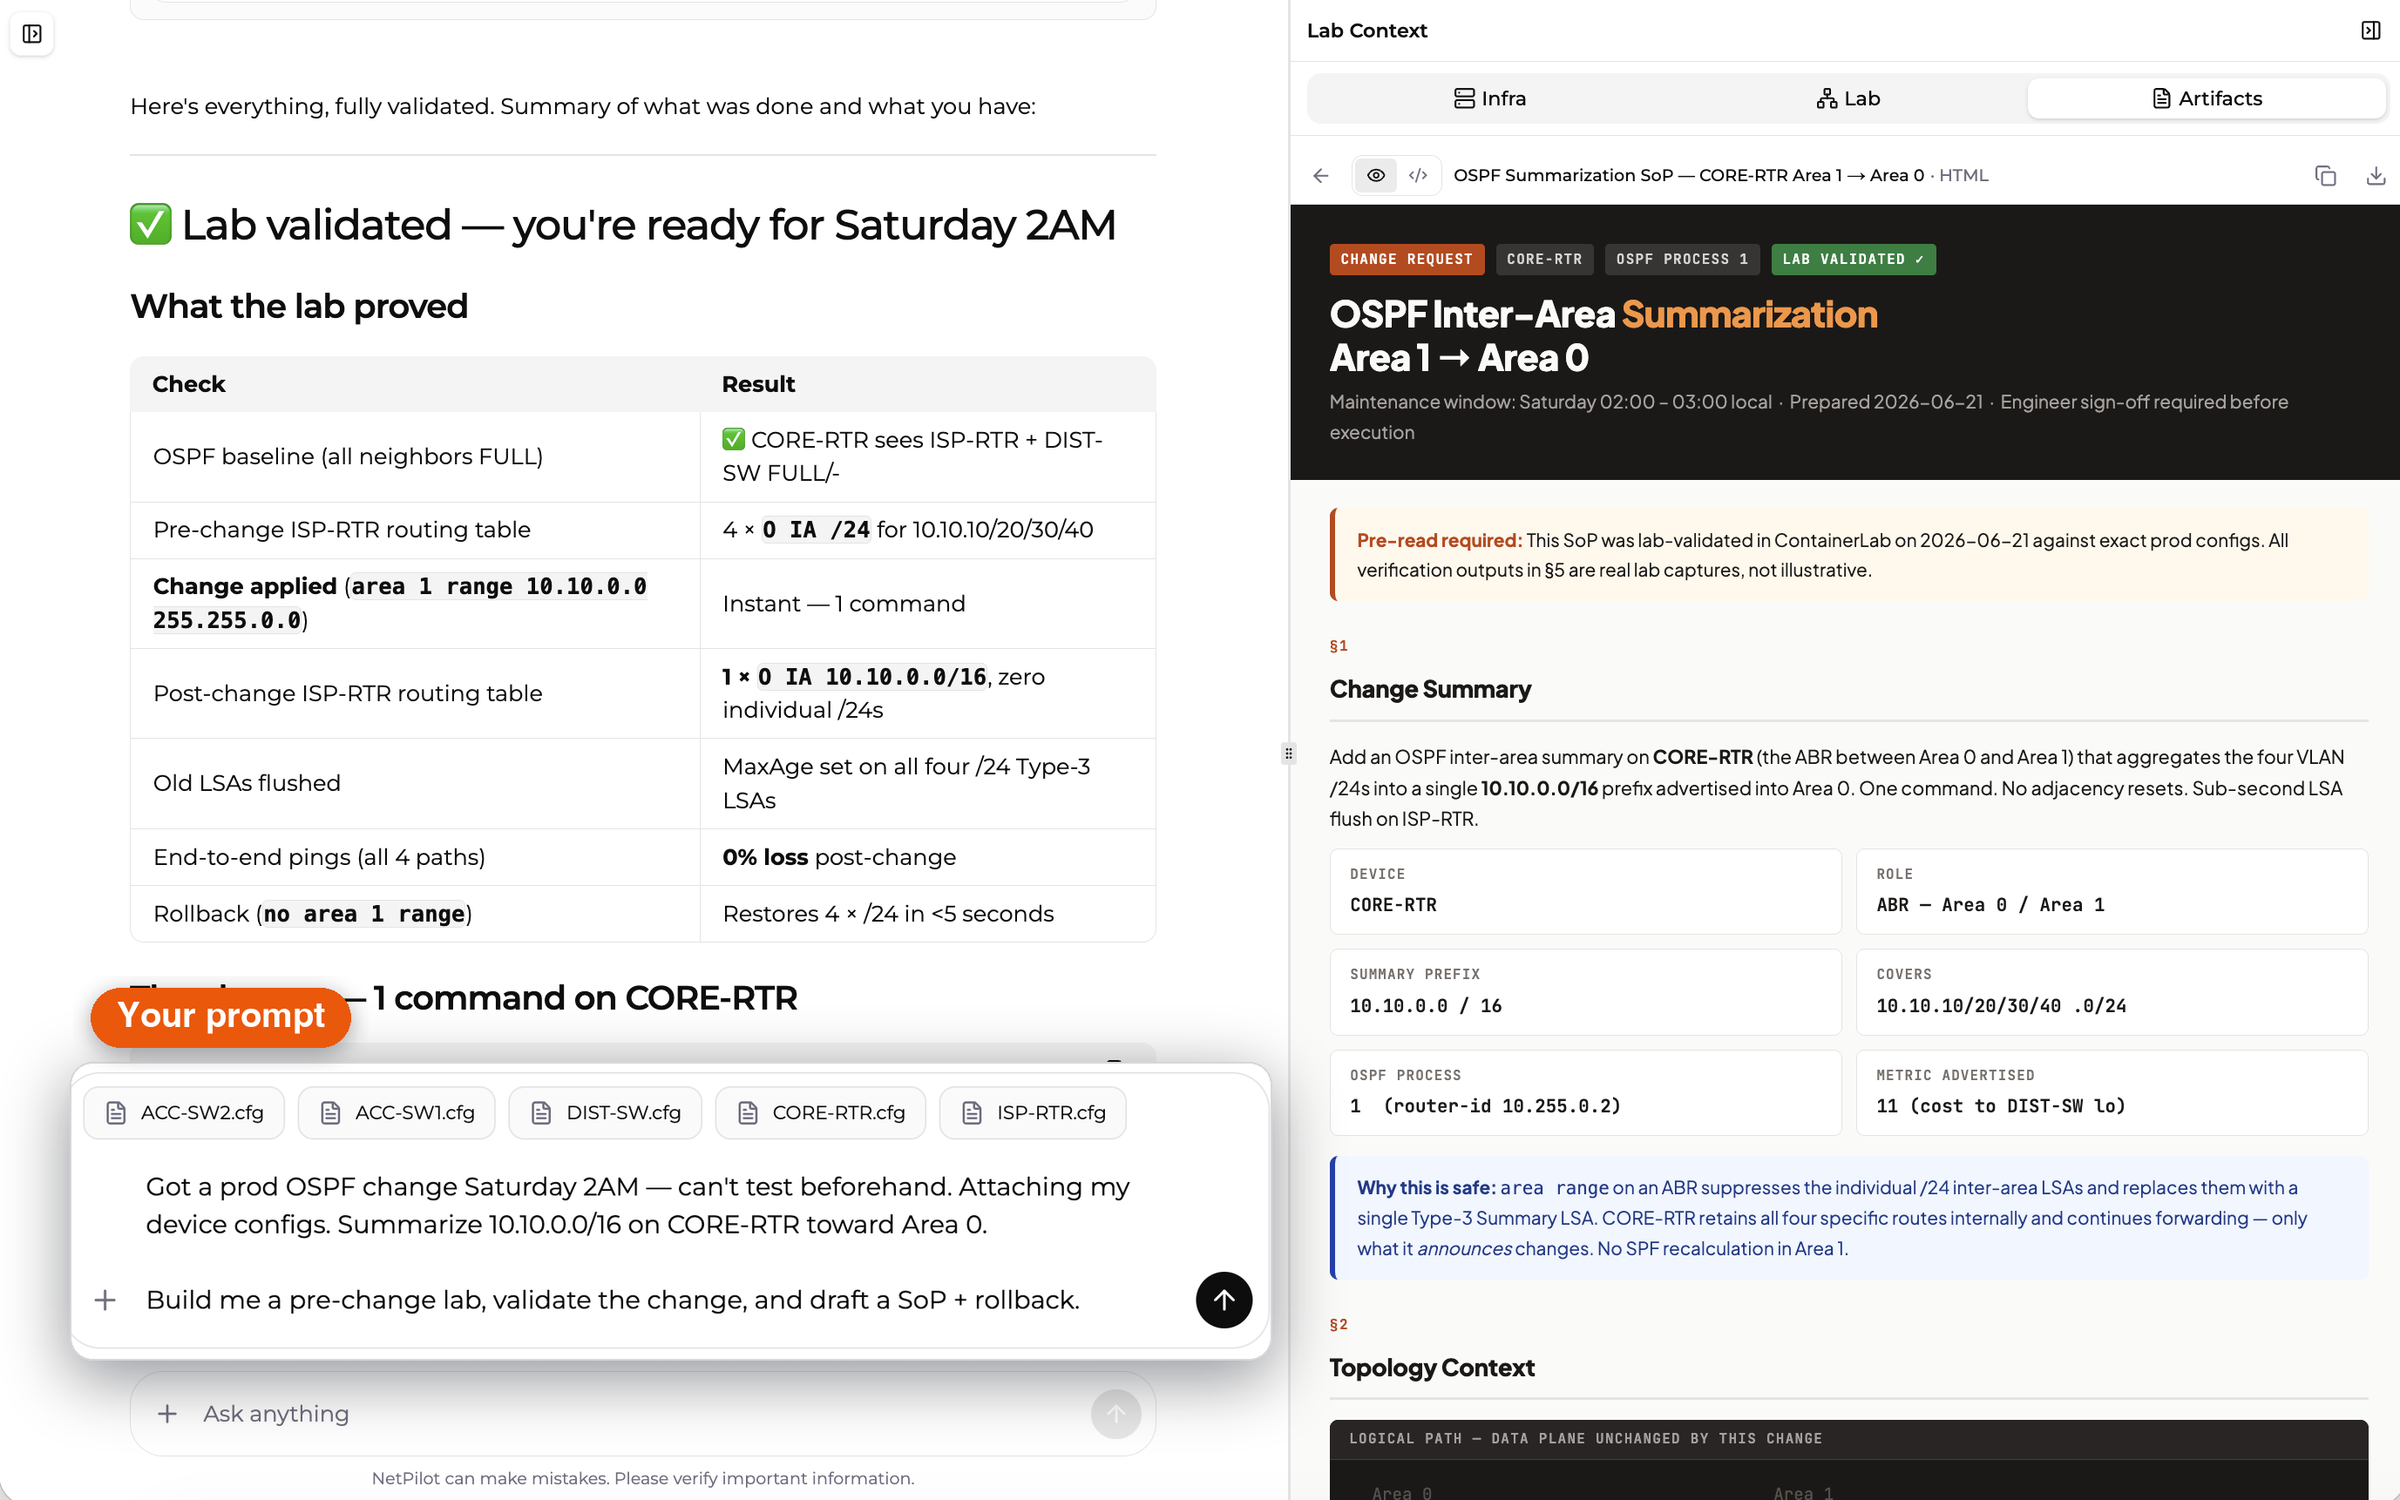
A pre-change validation in a NetPilot chat: the checks table on the left, the saved change procedure in the Artifacts tab on the right.
For more on the workflow itself, see network change validation and Stop Testing Network Changes in Production.
Team agents: who can publish and who can use them
- Who can publish. A team admin. Click the Create a team agent tile under Team Agents, or choose Everyone on my team in the editor. A published agent shows the status Published to your team.
- Who can use it. Every member of the team. The agent appears under Team Agents and in the composer's Agents list with a Team badge.
- What members cannot do. A member's card reads "View-only · team admin edits". Members cannot open the editor, so the instructions stay with the admins.
- What happens on delete. Everyone on the team loses the agent. Chats that use it stop and ask for a new chat, and their messages are kept.
A private agent cannot be turned into a team agent later. To share one, create it again as a team agent.
Where Agent Studio is available
Agent Studio and team agents are included with specific plans. The pricing page lists which plans include them.
Build it yourself or have it delivered
Build your own when your engineers can describe the workflow in a prompt. The pre-change validation agent above is that kind of work: a clear method, the tools NetPilot already has, and a report format you choose.
Have NetPilot deliver it when the workflow needs custom tools, testing against your network and a result you can hold us to. In that case NetPilot builds the agent, the harness and the tools, tests the agent on real network operating systems, and delivers the working result. The delivered agent arrives in the same place as the ones you build, and its tools show up in the Custom tools checklist from Step 6.
Agent Studio is where every agent lives. Build your own, or have NetPilot build and deliver one for you.
- Custom agents built and delivered by NetPilot
- The Agent Studio announcement
- Agentic AI for Network Engineers: What It Means and Why It Matters
FAQ
How do I build a custom AI agent for network engineering in NetPilot?
Open Agent Studio from the sidebar, click Create a private agent, then fill in one form: a name, the instructions, up to 4 conversation starters, a model and an effort level, and the tools the agent may use. Click Create and the agent appears as a card in Agent Studio. Click the card to start a chat with it.
What tools can a custom agent in Agent Studio use?
A custom agent can use up to seven bundles of tools, each a checkbox in the editor: Topology Design, Packet Tracer, VM Sandbox, Agent Workspace, Web, Follow-ups and Sub-agents. All seven are ticked on a new agent and you untick what the agent should not do. A second checklist, Custom tools, appears when NetPilot has switched on a custom tool set for your account or your team.
Can I share a custom agent with my team?
Yes. A team admin publishes an agent by creating it with Who can use it set to Everyone on my team. Every member of the team then sees it under Team Agents and can start chats with it. Members cannot edit a team agent or read its instructions. Only team admins can. The choice between Only me and Everyone on my team is set when the agent is created and cannot be changed later.
Can I switch agents in the middle of a chat?
No. You pick the agent on a new chat, before the first message, and it is fixed for that chat from then on. The agent also sets the model and the effort level for the chat. To use a different agent, start a new chat and pick it from the Agents list in the composer's model menu, or click its card in Agent Studio.
What are the limits on an agent in Agent Studio?
Each agent's instructions can run to 4,000 characters, and each agent can carry up to 4 conversation starters of 120 characters each. Agent Studio also caps how many agents an account or a team can keep, and the app shows the current numbers. Deleting an agent frees its slot.
Should I build a network agent myself or have NetPilot build it?
Build your own when your engineers can describe the workflow in a prompt. Have NetPilot deliver it when the workflow needs custom tools, testing against your network and a result you can hold us to. Both kinds of agent live in Agent Studio, so your team runs a delivered agent the same way it runs one it built.
Open NetPilot and build your first agent, or talk to us about having one delivered.